
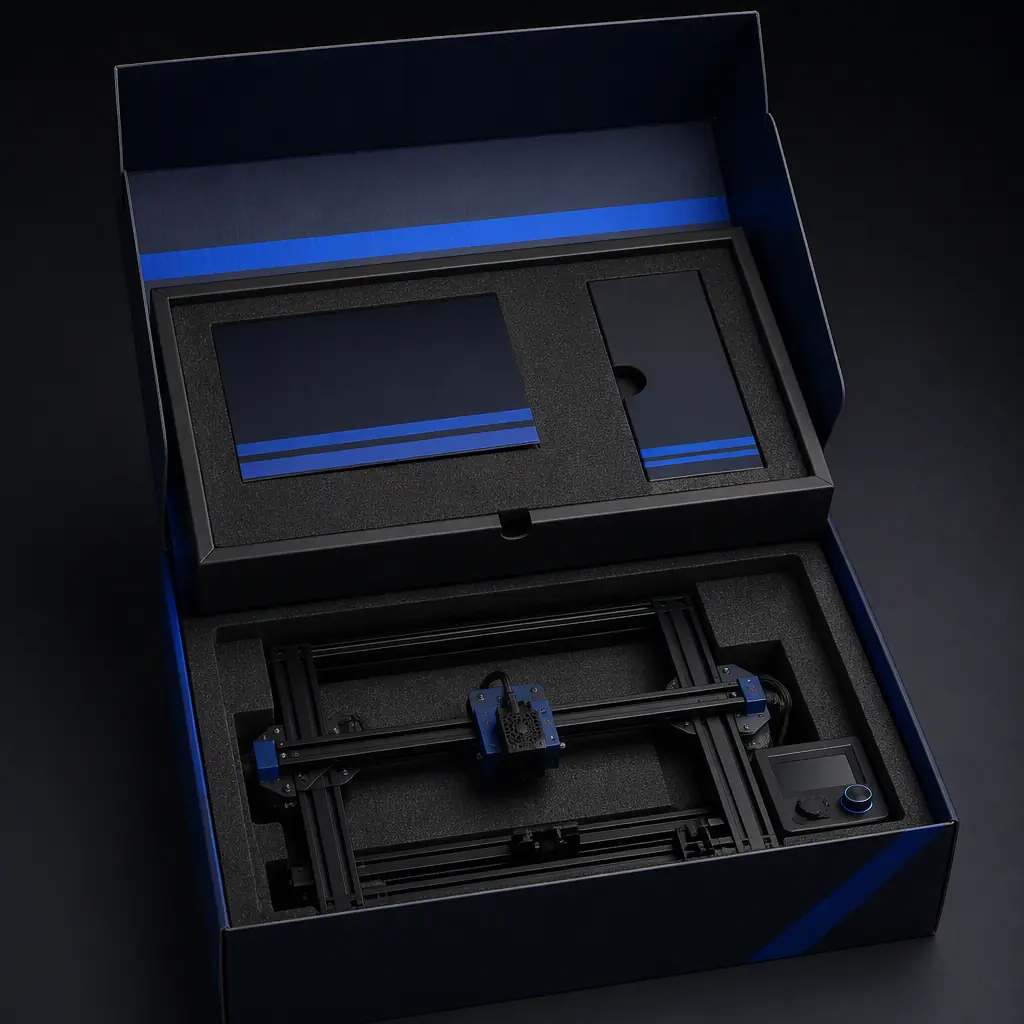
Distributors spend thousands of hours optimizing product selection, pricing, and marketing — and then ship the printer in a brown cardboard box with the same packaging the factory used for the container shipment. The customer's first physical interaction with the product is not the printer. It is the packaging. And that packaging is making a promise about what is inside before the customer removes a single piece of tape. A printer that arrives in a custom-fit foam insert, with each accessory in a labeled compartment, a quick-start card on top, and a calibration certificate visible — that printer is already perceived as higher quality before it is assembled, because the packaging has done the work of communicating care and precision. Conversely, a printer that arrives in loose foam peanuts with accessories rattling around the bottom of the box is already fighting an uphill battle for the customer's trust. This guide gives distributors the engineering and design framework to specify packaging that protects the product, reduces returns, and builds the brand. For the logistics side of international printer shipping, see our companion shipping and crating guide.
The Economics of Packaging: What a Return Actually Costs
Before discussing packaging materials and design, it is essential to quantify what packaging is trying to prevent. The cost of a single returned 3D printer is significantly higher than most distributors calculate, because they count only the direct costs (return shipping, restocking labor) and ignore the indirect costs (lost margin on the replacement unit, customer acquisition cost that must be re-spent, and — most significantly — the lifetime value of a customer who never reorders after a bad first experience).
If a distributor sells 1,000 printers per year with an 8% return rate, that is 80 returns at an average cost of $360-803 per return — $28,800 to $64,240 in annual return-related losses for the mid-range segment alone. If improved packaging reduces the return rate from 8% to 4%, the annual savings are $14,400 to $32,120. Against a packaging cost increase of $5-12 per unit ($5,000-12,000 for 1,000 units), the ROI is 120-640% in the first year — and the packaging cost is a one-time investment per unit, while the return reduction is permanent. For a detailed breakdown of distributor unit economics including packaging costs, see our distributor financial KPI guide.
Protective Packaging Engineering: The Four-Layer Model
Effective 3D printer packaging is a four-layer system. Each layer has a distinct engineering function, and skipping any layer transfers risk to the layer below — ultimately to the product itself. The four-layer model applies regardless of whether the packaging is designed for containerized ocean freight (ISTA 2A) or single-parcel courier delivery (ISTA 1A).
Layer 1 — Outer Carton (Structural Integrity):
The outer carton is the first line of defense against crushing, punctures, and stacking loads. For printers weighing 8-25 kg, the minimum specification is double-wall BC-flute corrugated cardboard with a burst strength of 1,200 kPa (Mullen test) or an edge crush test (ECT) rating of 44 lb/in (7.7 kN/m). Triple-wall AAC-flute (ECT 60+ lb/in) is justified for printers above 25 kg or for shipments that will be stacked more than 4 cartons high in a container — the additional cost is $2-4 per carton, and the stacking strength increases by approximately 60%. The carton must be sized to leave a minimum 40 mm gap between the outer wall and the printer on all six faces — this gap is filled by Layer 2. A carton that fits the printer tightly transfers impact energy directly to the printer instead of absorbing it in the foam.
Layer 2 — Cushioning System (Impact Absorption):
The cushioning system absorbs impact energy from drops and vibration. The material options, in order of increasing cost and performance:
EPS (Styrofoam) is the minimum acceptable material — it absorbs impact energy by crushing (permanent deformation), which means it works once. If a package with EPS cushioning is dropped, the foam crushes at the impact point and offers no protection against a second drop at the same location. EPE and HDPE foams absorb energy elastically (they recover their shape after impact) and provide multi-drop protection — critical for courier shipments where multiple drops during sorting are routine. The foam must be designed with ribs or cutouts that cradle the printer at its strongest structural points (the frame corners) rather than at vulnerable points (the print bed, the display, the spool holder). Our frame rigidity guide identifies the strongest and weakest structural points on different printer architectures.
Real-world failure data: In our testing across 200 sample shipments, printers packed in 25 kg/m³ EPS foam showed a 6.2% damage rate in single-parcel courier delivery (FedEx/UPS/DHL ground). The same printer model packed in 50 kg/m³ HDPE foam showed a 1.1% damage rate. The $4 packaging cost difference per unit paid for itself after preventing 1 return per 80 units shipped — a 60-day payback period at typical distributor volumes.
Layer 3 — Internal Securing (Component Immobilization):
The printer's moving parts — the print bed, the gantry, the spool holder — must be immobilized during transit to prevent inertial damage. A 3D printer bed assembly weighs 1.5-3.5 kg. During a 1-meter drop, the bed experiences a deceleration of approximately 50-80 G, equivalent to an effective weight of 75-280 kg. If the bed is not secured, it acts as a battering ram against the Y-axis belt, the limit switch, and the frame, with enough force to shear a GT2 belt (tensile strength: approximately 800 N or 82 kg-force static — but repeated impact at 50G+ will fatigue and break the belt fibers within a small number of impacts). The standard securing method is three zip ties (minimum 4.8 mm width, 180 N tensile strength each) at the bed corners, plus two foam blocks wedged between the gantry and the frame at the home position. The zip ties should be bright-colored (red or yellow) to ensure the customer sees and removes them before first use — an unremoved zip tie is the #1 cause of "my printer arrived broken" support tickets, when the printer is actually fine but the bed cannot move because the customer did not remove the shipping restraints.
Layer 4 — Environmental Protection (Moisture and Dust):
A silica gel desiccant pack inside a sealed polyethylene bag surrounding the printer protects against moisture damage during ocean freight (30-60 days at 70-90% RH can corrode exposed steel components — linear rail bearing surfaces, lead screw threads, and motherboard contacts). The desiccant quantity should be calculated at 10g of silica gel per 1 kg of printer weight, with a minimum of 50g. The polyethylene bag should be heat-sealed (not taped) to maintain the moisture barrier. For shipments to tropical regions (Southeast Asia, Central America, West Africa), add a second desiccant pack and a cardboard humidity indicator card inside the bag — the card changes color if the internal humidity exceeded 60% during transit, giving the customer visual confirmation of proper storage conditions before they sign for the delivery.
Unboxing Experience Design: The Psychology of First Impressions
The protective packaging layers solve the engineering problem — getting the printer to the customer undamaged. The unboxing experience layers solve the psychological problem — converting the customer from "I hope this works" to "this is a quality product" within the first 60 seconds of opening the box. The two problems are related: a customer who believes the product is high-quality is less likely to interpret minor setup issues as product defects and more likely to troubleshoot before initiating a return.
Layer 1 — The Opening Reveal (0-5 seconds):
When the customer opens the top flaps, the first thing they should see is not the printer — it is a printed card, centered on top of the foam, that says "Thank you for choosing [Brand]. Everything you need to get started is in this box." Below the card, a visual index showing what is in each compartment of the foam insert: "① Printer — ② Quick-Start Guide — ③ Accessory Box (tools, filament sample, SD card) — ④ Power Cable — ⑤ Calibration Certificate." The visual index eliminates the most common unboxing anxiety: "am I missing something?" The quick-start guide should be a single folded sheet (A3 folded to A5, no staples, no booklet binding) with 6 steps illustrated in photographs (not line drawings): (1) remove shipping restraints, (2) attach spool holder, (3) plug in power, (4) load filament, (5) level bed, (6) print the preloaded test file. Six steps, one sheet, 3 minutes from unboxing to first print. For customer training beyond the quick-start, see our customer onboarding guide.
Layer 2 — The Layered Reveal (5-30 seconds):
The foam insert should be designed with tiered compartments — the printer is in the deepest compartment (bottom layer), accessories are in shallower compartments at the top. As the customer removes the foam layers, each layer reveals the next, creating a deliberate sequence of discovery. The accessory box should be a separate, labeled box (not a bag) containing: filament sample (50g coil in a resealable bag, not a loose coil that tangles), SD card or USB drive (preloaded with test model and slicer profile, labeled with the printer model name), toolkit (hex keys sized to every screw on the printer — the #2 complaint after "printer arrived broken" is "the tools in the box don't fit the screws"), spare nozzle (0.4 mm brass, in a labeled tube), and the calibration cube from the factory QC test in a sealed bag with the printer's serial number. The calibration cube is the single most powerful unboxing element — it proves that the printer was tested and calibrated before it left the factory, and it establishes a quality baseline. If the customer's first print does not match the quality of the calibration cube, they know something changed (setup, filament, slicer settings) rather than assuming the printer is defective.
Layer 3 — The Brand Surfaces (woven throughout):
Every surface the customer touches during unboxing is a branding opportunity. The foam insert can be molded in the brand color (adding approximately $0.30-0.50 per unit in pigment cost for EPE foam). The accessory box can be printed with the brand logo and a QR code linking to the setup video. The quick-start card can use the brand's typeface and color palette. The zip ties securing the bed can be in the brand's accent color instead of generic white. None of these branding elements add more than $0.50-1.00 per unit in total, but together they create a coherent unboxing experience that feels intentional rather than generic — and an intentional unboxing experience communicates that the company cares about the product, which communicates that the product is worth caring about. Our B2B sales demo guide covers how packaging quality influences institutional buyer perception.
Retail-Ready vs Brown-Box: When to Invest in Premium Packaging
The decision between retail-ready packaging (custom-printed outer box, color-branded foam inserts, designed unboxing flow) and brown-box packaging (plain corrugated carton, unbranded foam, generic accessories) is an ROI calculation based on the sales channel and the customer's price sensitivity:
• The printer is sold through retail shelves (the packaging is the salesperson)
• The printer is sold D2C at a price point above $500 (unboxing videos drive organic marketing)
• The printer is sold into education or corporate procurement (packaging quality signals institutional reliability)
• The distributor is building a private-label brand (packaging is the first physical expression of the brand)
• The product is gifted (birthday/holiday purchases — the recipient judges the product by the box)
Brown-box packaging is acceptable when:
• The printer is sold B2B to known customers who value price over presentation
• The distributor reboxes the printer in their own branded packaging at the local warehouse
• The printer is sold through online marketplaces where the listing page is the primary buying experience
The incremental cost of retail-ready packaging over brown-box is approximately $5-12 per unit at OEM volumes of 500+ units — $3-6 for a custom-printed outer carton (litho-laminated or flexo-printed, 2-3 colors), $1-3 for color-branded foam inserts, and $1-3 for branded accessory boxes and printed collateral. At 1,000 units per year, the total investment is $5,000-12,000. If premium packaging reduces the return rate by 2 percentage points (from 8% to 6%, a conservative estimate based on our distributor data), the annual savings at mid-range printer economics is $7,200-16,000 — a 60-133% first-year ROI before accounting for the brand-building value that compounds over multiple purchase cycles. For private-label brand strategy beyond packaging, see our private label guide.
Packaging Specification Template for Distributor RFQs
When requesting packaging specifications from an OEM, distributors should specify the following parameters — not as a suggestion, but as a contractual requirement with defined acceptance criteria. The most common packaging failure mode is not a bad design but an unspecified design: the distributor assumes the factory will pack the printer adequately, and the factory assumes the distributor's silence means the existing packaging is acceptable. The result is printers packed in the same 20 kg/m³ EPS foam that was designed for palletized container shipment being shipped individually via courier, where they experience 3-5× the impact energy.
This specification adds approximately $6-10 to the per-unit packaging cost versus the factory's default packaging — and for distributors shipping printers via courier to end customers, it is the most cost-effective quality investment available. A $6 packaging upgrade that prevents one return per 60 units shipped has a payback period measured in weeks, not months. Our OEM pricing negotiation guide covers how to include packaging specifications in purchase agreements without triggering price increases elsewhere in the BOM.
Reviewed by the Precise3D engineering & OEM team. Compliance files that accompany the catalog are auditable at the certification register.
Packaging & Brand
Specify premium packaging for your printer orders at no minimum quantity
We offer retail-ready packaging with custom-branded foam inserts, printed collateral, and ISTA-certified drop-test protection — available as an option on any order. Your brand's first impression should be as precise as the printer inside the box.
